
Taplist Pi Zero
So, if in your homebrew life, you’ve moved on past bottling (because its it f***ing terrible) and are kegging your ferments, you’ve probably already come up with some way to label or mark your taps so you know what tap is pouring what beverage. I know there is a lot of articles out there on this topic, but, I wanted to share my experience on the matter, and hopefully, it can save you some time, and money.
As you can probably tell, I’m a bit of a tech nerd, so obviously I wanted digital signage. I mean there is several options out there to do this manually. Tap handles with black board surfaces you can write on with chalk, or even black board spray paint, you could paint on your kegerator or keezer. Or maybe make some other type of labels that hang on the taps or whatever. But I didn’t want anything like that, I wanted an actual taplist. One of the main reasons this was even remotely cost feasible for me, is I had an extra 22” LCD monitor laying around. If you have to buy a monitor to pull this off, then this walk through probably isn’t for you, but if not here is a list of things you’ll need:
- Raspberry Pi Zero
- MicroSD Card (8GB minimum)
- 1.2A Minimum Power Supply (basically any old cell phone charger)
- HDMI Cable (mini HDMI to what ever interface is on the display)
- Raspberry Pi Zero Case (optional, you could also 3D print this too)
The first time I did this, I used a Raspberry Pi 3, which is probably over kill for hardware to make a taplist, especially when all we are going to do is display a web page. A few months ago, I need a Raspberry Pi for another project, and when I looked to buy one, they are like $30, however, at the time, I found a Raspberry Pi Zero for $5 (at the time of this writing it is ~$15). It doesn’t have near the hardware resources, but again, we are just going to be displaying a webpage. (Also, with taplist.io, you can use a kindle fire stick, I haven’t ever set it up with that, but I do know that there instructions on the product page on how to set one up.) So, lets get started.
taplist.io
The premise of this digital taplist, uses a free product (for personal use) called Taplist.io. You will need to create an account, and from there, you can create taps, build your beverage database, create kegs, attach kegs to taps. I’m not going to go into very much detail on this part because there is so many variables, and so much customization you can do with it. what ever you customize under the “Look And Feel” section of your dashboard, is what will be displayed on the final product when you are finished. The other nice part is you get an online taplist you can share with anyone (you can find mine at the bottom of this page, by clicking the “beer mug” icon).
Setting up the Raspberry Pi Zero
For the first part of this build, we need to install and configure the Raspberry Pi Zero, we will be installing the latest version of Raspbian Stretch Lite.
- Download the latest img for Raspbian Stretch Lite here.
- Open the
Disk Utilityapp:- Press
CMD+SPACEto open theSpotlightapplication. - In the search bar type
Disk Utility.
- Press
- In the top left had corner, select
View, and be sureShow All Devicesis selected. - Next, you will need to be sure the SD card is formated with the FAT file system.
- Select the SD drive in the left pane.
- Select
Erasefrom the top. - Make sure you pick
FAT (MS-DOS)for the file system, andMBR (Master Boot Record)for the partition. - THIS WILL ERASE THE ENTIRE SD CARD, SO BE SURE YOU HAVE SAVED ANYTHING YOU WANT TO EVER SEE AGAIN!
- Open a
terminalusing theSpotlighttool (see step 2) and typeTerminal. - In the
terminalapplication, find your disk number by runningdiskutil list - Note your disk number, it will be in the format of
/dev/disk2, it may not actually be the number2, just look at the size of the disk and make sure its the correct one. - Unmount the disk with
diskutil unmountDisk /dev/disk2, again, replace2with number of your SD card. - write the image to the SD Card with
dd:sudo dd bs=1m if=Downloads/raspbian-stretch-lite.img of=/dev/rdisk4 conv=sync- Replace
Downloads/raspbian-stretch-lite.imgwith the path to the.imgfile you downloaded in step 1. - Again, replace
rdisk4with the disk number you found in step 7. - This may take some time, took my system about 10 minutes on an 8GB SD Card with a Thunderbolt SD Card Reader.
Configuring Raspbian Lite Stretch
After the img is done writing to the SD card, its time to being configuring Raspbian. Because the Raspberry Pi Zero has such little hardware, we are going to try to keep this as minimal as possible.
- SSH is disabled by default, so to enable it, you need to create an empty file called
ssh:touch /Volumes/boot/ssh
- Next, you need to append
dtoverlay=dwc2to the end of/Volumes/boot/config.txt. You can do this either withtextEditor with a terminal editor. - This next step is a little tricky, first open
/Volumes/boot/cmdline.txt, and located the textrootwait, immediately after that, add a space, and then this text:modules-load=dwc2,g_ether. So it should look like this:rootwait modules-load=dwc2,g_ether
- Now go ahead and eject the SD card and then load it into the Raspberry Pi Zero and plug in the power. It will take about 60 seconds to boot up, then connect it to your computer.
- Next, go to
System Preferences > Networkand you will see a new device calledRNDIS/Ethernet Gadget.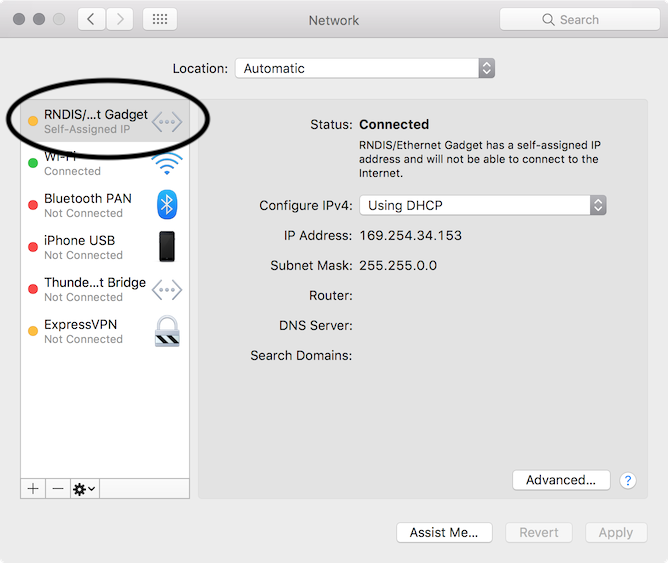 This is the Raspberry Pi Zero, you can share your internet connection to it, which will then all you to SSH to the device.
 - Go to
System Preferences > Sharingand enable internet sharing for theRNDIS/Ethernet Gadget.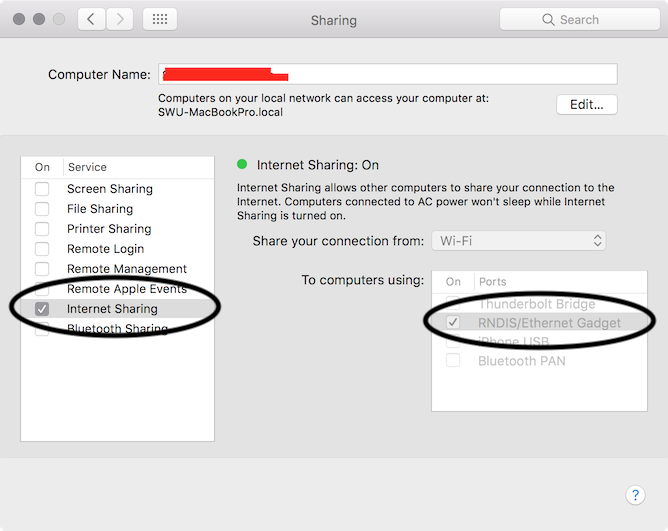
- You should now beable to
sshto the Raspberry Pi Zero:ssh pi@raspberrypi.local- Default password is
raspberry. - Type
yesto accept the certificate thumbprint.
- After you are connected, there are a few things that need to be set, run
raspi-configand update the following:- CHANGE THE DEFAULT PASSWORD else anyone can now
sshto your taplist board with the default credentials! - Under
Boot OptionsselectDesktop/CLIand then selectConsole Autologin. - Lastly configure the wifi.
- CHANGE THE DEFAULT PASSWORD else anyone can now
- You are now connected to your wifi, and can update the system:
sudo apt-get update -ysudo apt-get upgrade -ysudo apt-get dist-upgrade -y
- Now, install the minimum X Server Environment for Chromium:
sudo apt-get install --no-install-recommends xserver-xorg x11-xserver-utils xinit openboxsudo apt-get install --no-install-recommends chromium-browser
- You need to configure the auto start commands, and to do this, you will have to use a terminal based editor, like
nanoorvi. I prefernano:sudo nano /etc/xdg/openbox/autostart
-
Replace the entire contents of the file with this:
# Disable any form of screen saver / screen blanking / power management xset s off xset s noblank xset -dpms # Allow quitting the X server with CTRL-ATL-Backspace setxkbmap -option terminate:ctrl_alt_bksp # Start Chromium in kiosk mode sed -i 's/"exited_cleanly":false/"exited_cleanly":true/' ~/.config/chromium/'Local State' sed -i 's/"exited_cleanly":false/"exited_cleanly":true/; s/"exit_type":"[^"]\+"/"exit_type":"Normal"/' ~/.config/chromium/Default/Preferences chromium-browser --disable-infobars --kiosk 'https://www.taplist.io/display' - You need to configure X Server to autostart and boot and load the display web page.
nano ~/.bash_profile- Add this to the file:
[[ -z $DISPLAY && $XDG_VTNR -eq 1 ]] && startx -- -nocursor - Save and close the file.
- Lastly shut you Raspberry Pi Zero down
sudo shutdown nowand go attach it to your monitor. You do not need to attach any peripherals, on its next boot, it will autologin as thePiuser, and start upChromiumand navigate to https://www.taplist.io/display. The very first time this boots, there will be a code on the screen that you need to go to https://taplist.io/activate and enter in.
WHEW! Thats it, hopefully you made it this far, and ended up with something like this 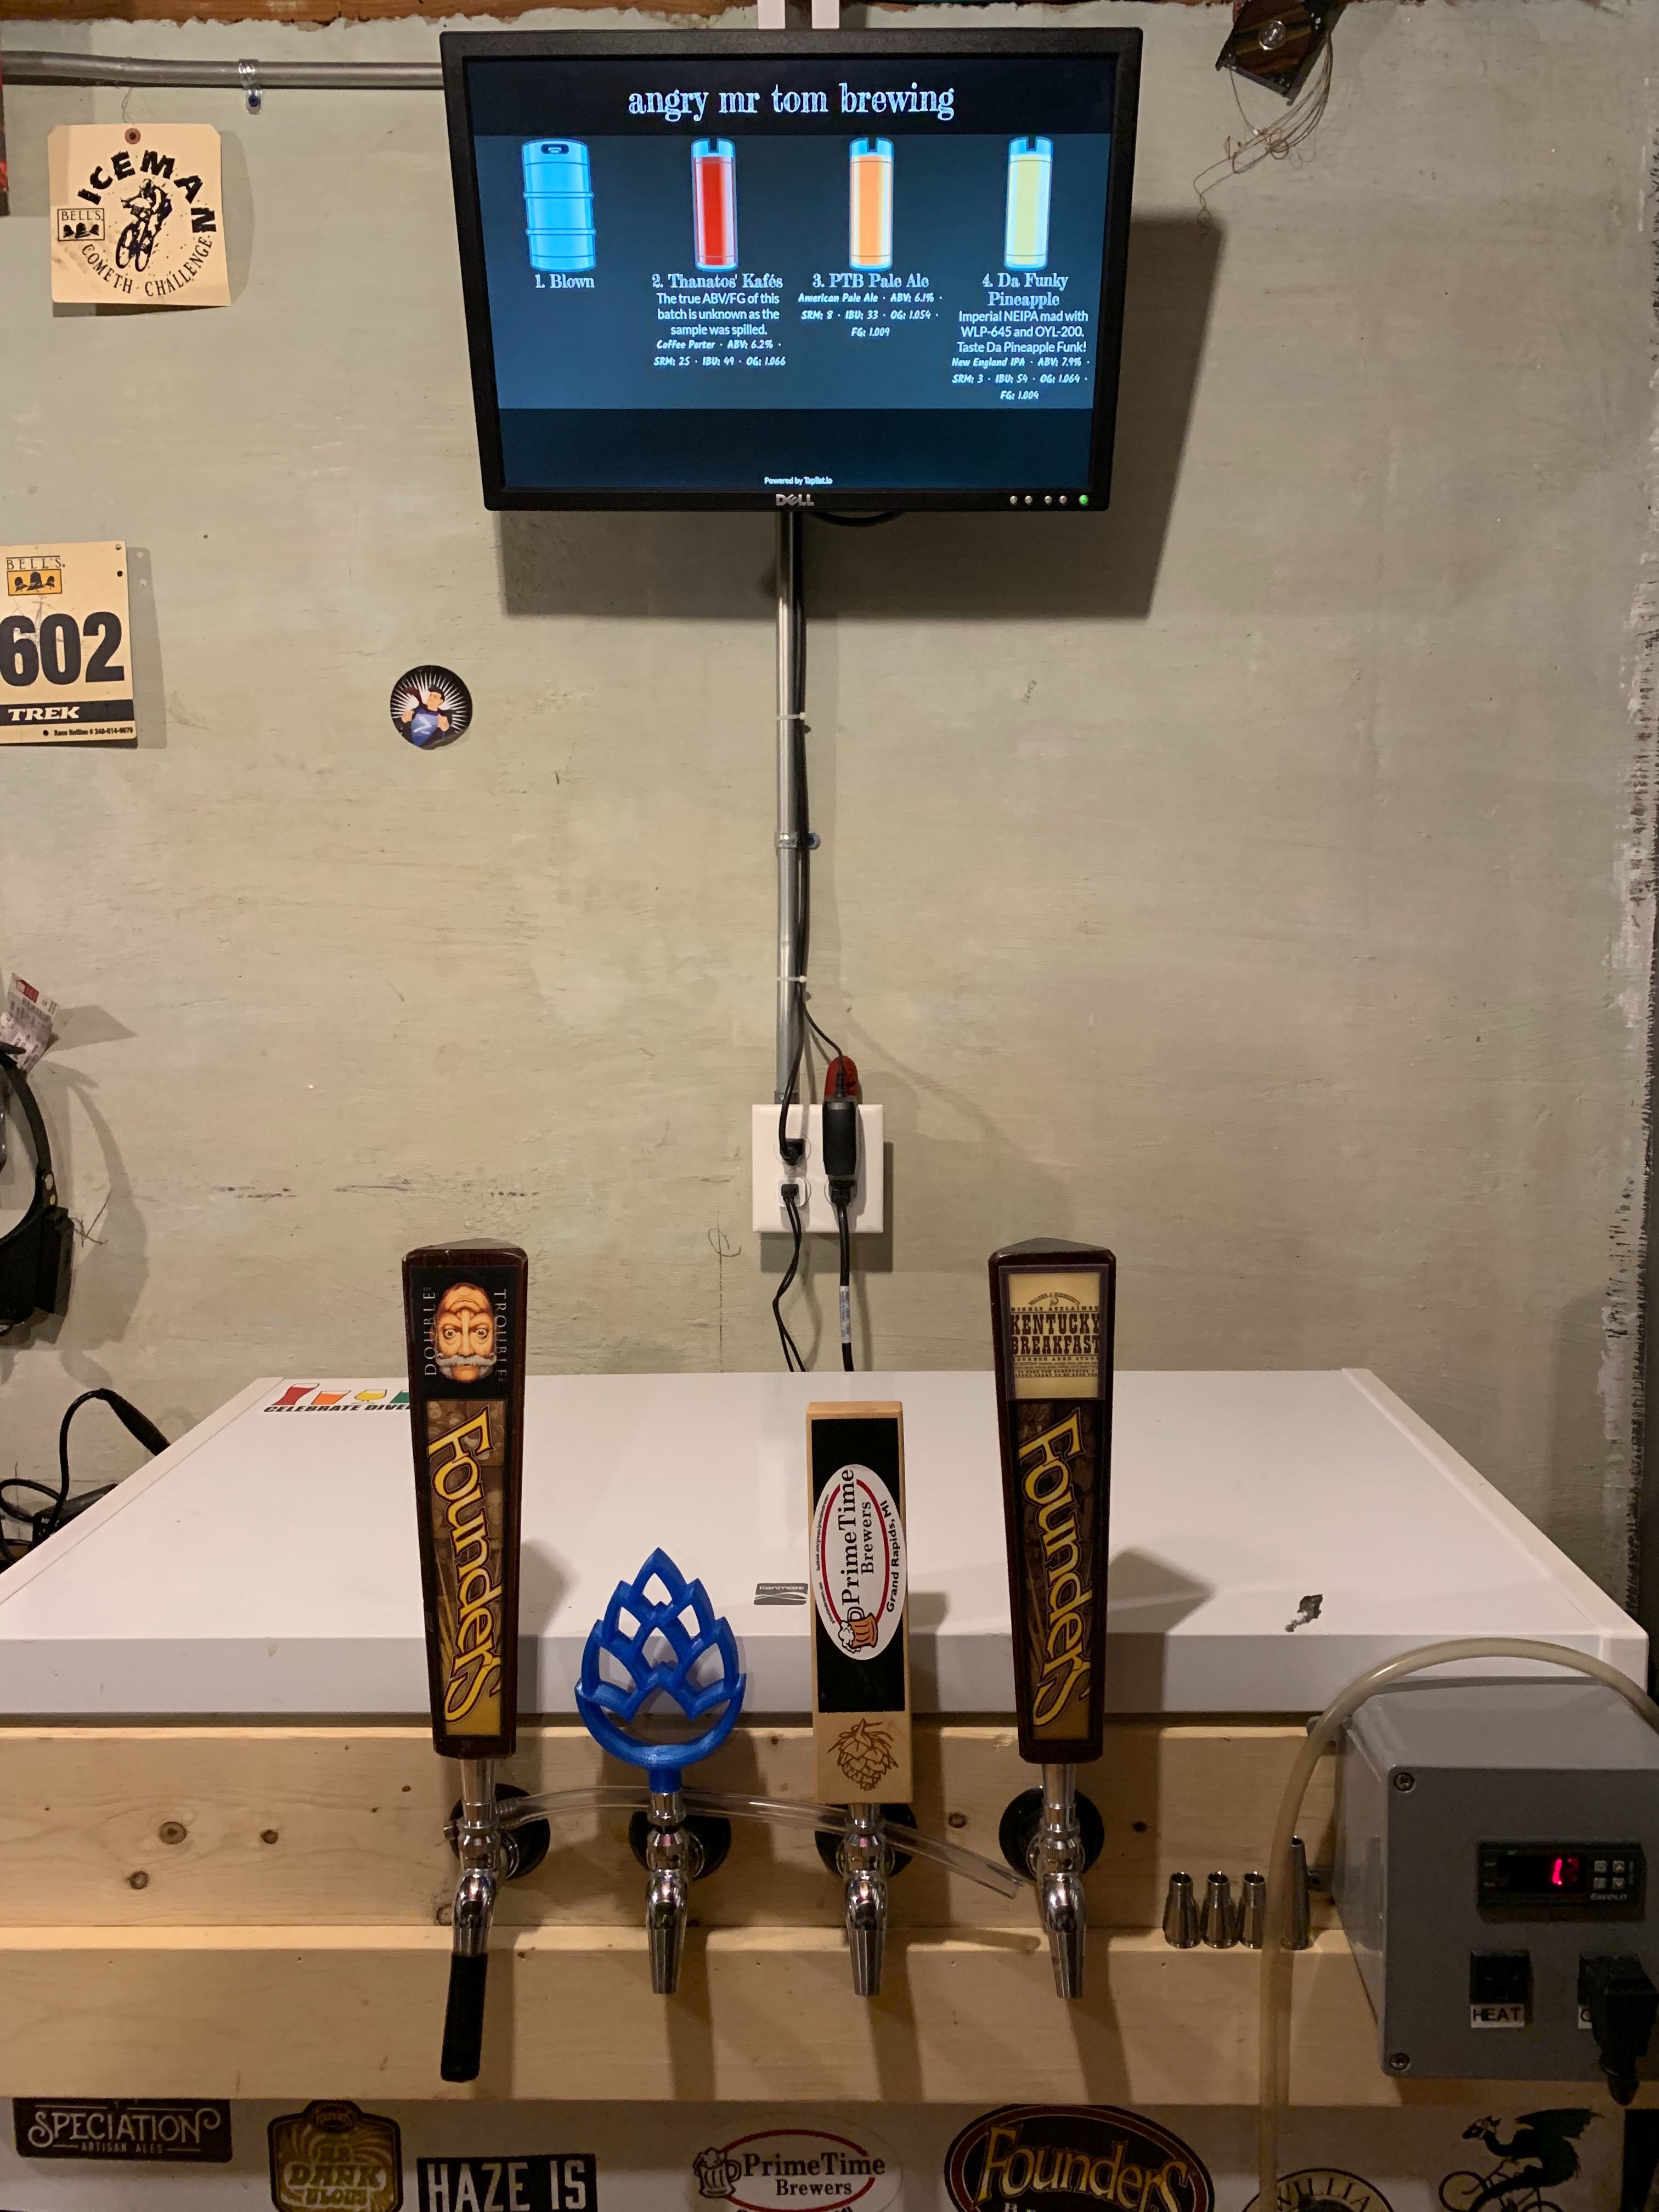
Cheers!
Sources
- https://brandonb.ca/raspberry-pi-zero-w-headless-setup-on-macos
- https://bdking71.wordpress.com/2018/11/06/setup-an-information-kiosk-using-a-raspberry-pi-zero-w/
- https://taplist.io/help/raspberry-pi-setup