Klean Yer Keezer Lines
I’m not sure out there who needs to hear this, but clean your beer lines! After a while of beer sitting, lines begin to stain and leave flavors that will be picked up by other beers. I mean who wants to have a lingering coffee porter in your NEIPA? No one, thats who. There is no one size fits all for how often you should clean your lines, it depends a lot on things like how long the beer has been siting in them, how often are they used, and what style of beer. In the past, I would just replace the lines every 6 months. There is a few things wrong with doing this, first of all, its costly, second of all, its a pain in that ass, and third, six months between cleaning/replacing is too long IMO. Now I am rinsing lines every other month. Maybe that is too often, but after you see how easy it is to do, I could do it even more often and not really mind.
Build It
So, the most important part of this build, is the pump. The good news is, if you built a keg washer based on my last post (CIP DIY Keg Washer), then you already have a pump that will work perfect for this. That pump has the power to push cleaner through 4 taps, each with 10’ of beverage line. If you have more then 4 taps, either you’ll have to do it in sections, or you may need a more powerful pump.
Here is the basic premise of this line cleaner, you are going to pump cleaner INTO tap #1, then connect that line to the tap line next to it, so the cleaner will be coming OUT tap #2. Then you connect tap #2 to tap #3, and again, connect tap #3 and tap #4 lines together, and this will cause the cleaner to come out tap #4, and back into the the bucket that the pump is in, allowing for the cleaner to be continuously recirculated through all taps and lines.
TLDR Connect everything together in a way allowing for cleaner to be pumped into tap #1 and come out tap #4.
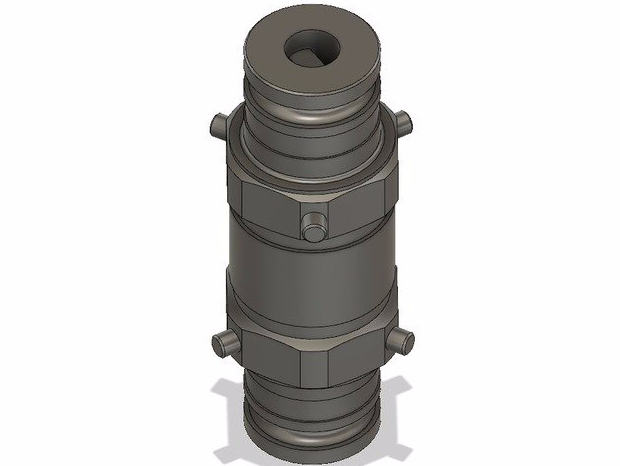
A key component of this will be hooking beverage line to beverage line. Which means you need a custom fitting allowing for disconnect to connect to disconnect. If you have old kegs lying around, I guess you could steal pieces from that. You could buy posts, but that would way more expensive then just replacing the lines regularly. Im sure you already know what I did…of course, I designed something that could be 3D printed (Thingiverse link).

I’m actually pretty proud of this design, it was pretty in depth to make, and I got to learn some really interesting things with Fustion360 (something similar, not designed by me, but the same concept for ball locks can be found here). I printed two of these, allowing me to connect pin lock to pin lock disconnects together.

I had to get some rubber O-rings for them, #10 faucet O-rings from my local hardware store. I don’t normally discuss print settings for things because there is so many variables, but one thing I will say, is print these at 100% infill as pressurized liquid will be flowing through them. Or, if you don’t want to go the route of connecting beer lines together via the disconnects, if the barbs on your disconnects are removable, the you could remove the disconnect and use a pressure fitting to connect them. I like the way I have it, because its also cleaning the disconnects this way.
Outside of those two major things, the only other parts you need is a barb to go in place of your CIP Ball on your keg washer (see previous post), some hose or tubing, I just use the same silicone tube I use when kegging, and some actual BLC (Beer Line Cleaner).
Use It
After you have all together, the rest is easy, mix up enough BLC in a bucket to submerge your pump, run your pump into tap #1, connect tap #1 line to tap #2 line, connect tap #2 to tap #3, I just used a small piece of silicone tube for this, then connect tap #3 line to tap #4 line. BE SURE TO OPEN ALL YOUR TAPS! Turn the pump on and let the liquid flow though your keezers veins, and come out tap #4. Now, my taps are close enough together I can do this with a five gallon bucket, but you may have to get creative if thats not the case for you.
Thats pretty much it, let that recirculate for 15-20 minutes. Empty the bucket and fill with hot clean water, and rinse for 10 minutes. I usually rinse for 5 minutes, empty the bucket, fill again with hot clean water, and rinse another 5.

Thats it. And I’m sure the patrons of your homemade beer will have much praise to give on how fresh and clean your homebrew has become. Cheers!
